|
How to use myManStat |
  
|
|
How to use myManStat |
|
Depending on the device you use, download the MyManStat app from either the Apple or Google Play stores.
2. LOGGING INTO MYMANSTAT
Download the MyManStat app from either the Apple or Google Play stores.
Tap the MyManStat icon to open the app. This brings you to the login page.
If you want your device to remember / forget your login details then toggle the "remember me" switch on / off.
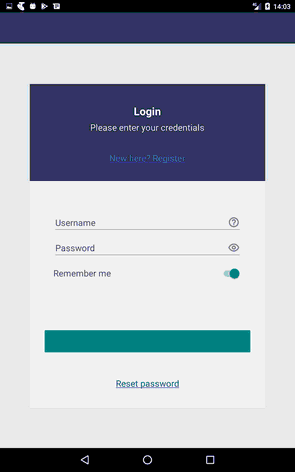
If you have already registered, enter your username (email address used when registering your account) and password, in order to enable the login button, to login to the app.
When you first log in to the app, you will be asked for permission to "allow access" to your location, photos, media and files on your device.
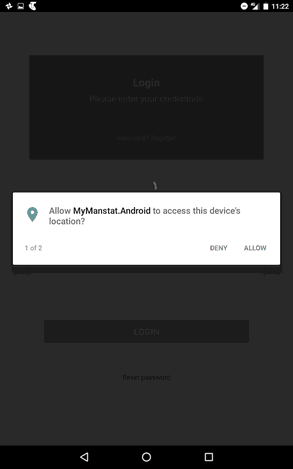
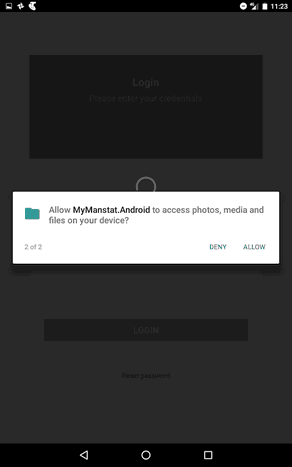
You will need to allow this access if you wish to be able to add or take photos, or use your device's location.
3. REGISTERING MYMANSTAT
If you have not already registered, tap on "New Here? Register" and the following screen will be presented.
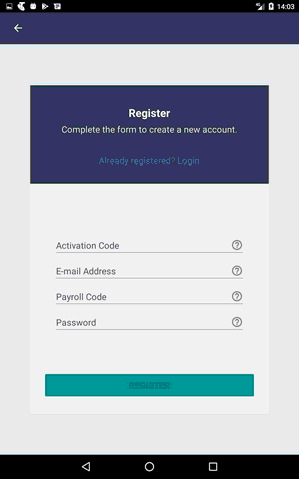
Activation Code: You will need to request an Activation Code from your employer/company
E-mail Address: Should be your unique email and will become the Username you use to log in to all ManStat apps
Payroll Code: You will need to request your Payroll code from your employer
Password: This should be 6 characters or longer and contain letters and numbers
4. FORGOTTEN PASSWORD / RESET PASSWORD
If you have forgotten your password you can tap on reset password at the bottom of the login page. This will open up the following page:-
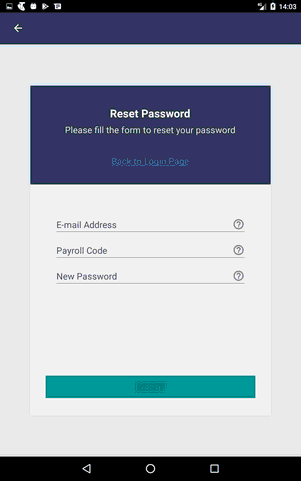
A successful reset will log you in automatically.
E-mail Address: Should be your email (user name) that you registered originally for MyManstat
Payroll Code: Your Payroll code from your employer
Password: This should be 6 characters or longer and contain letters and numbers
5. WELCOME / LANDING PAGE
Once logged in, if you have the permission, you will be presented with the welcome page which will have one or more of the following menu options, again depending on your permissions.
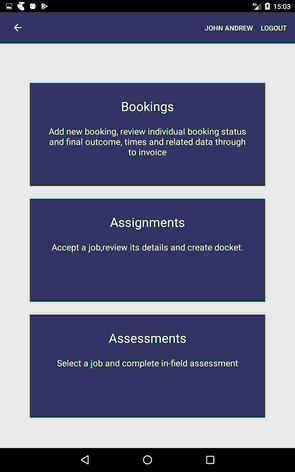
Bookings: tapping on this allows you to add new bookings, review individual booking status and final outcome, times and related data through to invoice.
Assignments: tapping on this allows you to view all jobs assigned to you, accept a job, review its details and create docket/s.
Assessments: tapping on this allows you to select a job and complete an in-field assessment.
6. ASSIGNMENTS
If you have permission to see the jobs assigned to you, you will either be directly navigated to the Assignments List page or you will be presented with the "ASSIGNMENT"
option at the "Welcome" page (second option at the Welcome page image) and tapping it will take you to the Assignment List page.
6.1 Job List PAGE
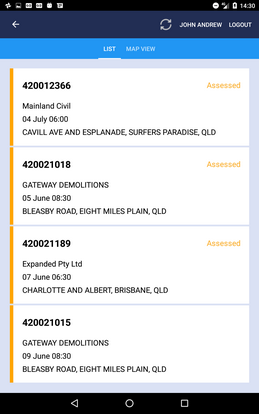
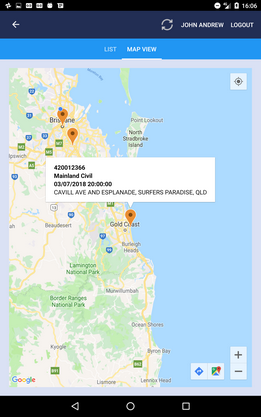
This page has two tabs, "LIST" and "MAP VIEW". You can toggle between each view by either swiping left or right or tapping the "LIST" or the "MAP VIEW" tab
At the top of the page you can click on the refresh button to update your Assignments, you can tap on the back button to navigate to the previous page or you can also log out.
Each Assignment showing on the List tab will display a summary of each job, including the job number, company name, start date and time, and job address. Each Assignment showing on the Map View is presented as a location pin. Tapping on each pin will display a detail label showing the Job Summary similar to the "List" one. On Android devices tapping the detail label on the "Map View" will take you to the "Job Details" page.
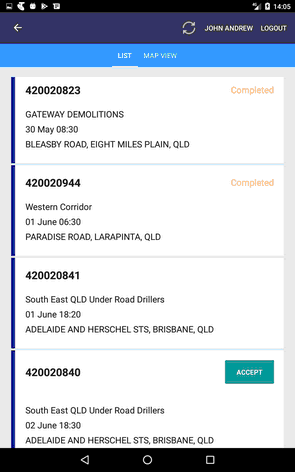
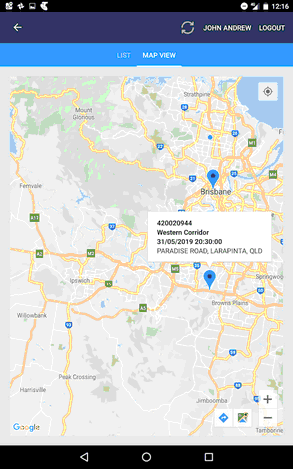
There are three types of Assignment status, "pending", "confirmed" and "completed".
Pending: If the job is showing with an "Accept" button you can confirm it by tapping the "Accept" button. By accepting the job, you are then able to enter your times, complete the checklist required for the job and see the documents relating to the job (if you have the required user permissions).
Confirmed: Once the job is confirmed, after tapping the Accept button, there will not be anything showing on the right hand side of the screen, i.e.: Job 420020841 in above picture.
Completed: Once you have entered and submitted your timesheet, the status of the Assignment will change to "completed" i.e.: Job 420020944 in above picture.
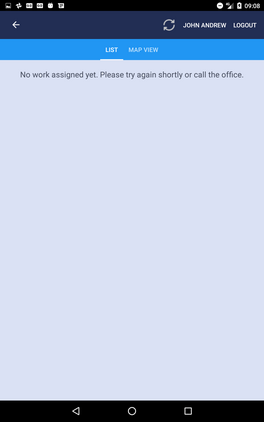
If no job has been assigned yet, the assignment list page's "List" view will look like the following image and therefore there will be no location pin on the "Map view" either.
6.2 Job Details PAGE
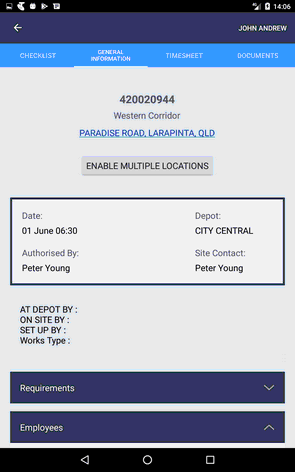
Tapping each job will take you to the Job Details page with four tabs namely "General Information", "Timesheet", "Checklist" and "Documents". You need to have specific user permissions to be able to see each of the tabs ( user permissions are described in the user permissions section of the manual). In addition to the permission ,"Documents" tab will only be available if the job has any related document/s.
Note the tabs are located at the top of the page on Android devices and at the bottom on Apple devices.
The docket that you would normally complete manually is now completed on two to three pages (tabs) but combines to one docket when sent to the server.
View on Android Tablet View on iPad
If the job is still pending you will only have access to the General Information page where you can accept/confirm the job by tapping the "Accept" button at the bottom of the page. Each of the tabs, their content and purpose are explained in the next sections.
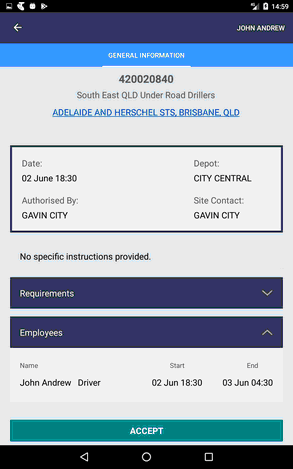
6.2.1 General Information
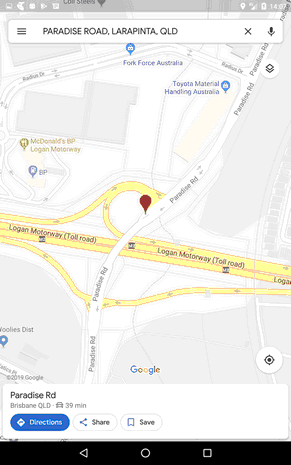
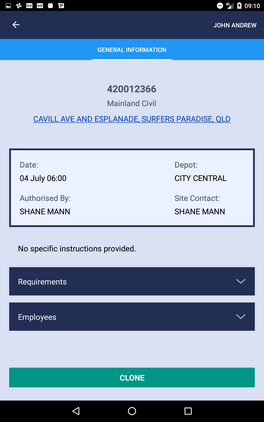
The General Information page is the default tab when the "Job Details" page is opened. At the very top you will find the job header displaying the job number,company name and its address. Tapping the underlined address line at the job header, will launch your device's navigation application if available i.e.:"Google Maps".
To return to your MyManstat app, on apple devices, tap the "MyManastat" arrow at the top of the map view, and on android devices, tap your device's back button.
The General Information page (tab) also contains other information about the job including the job requirements, employees allocated to the job and specific instructions.
"Requirements" drop down list (tap the arrow to expand/collapse the list), displays the job's requirements and quantity for each requirement.
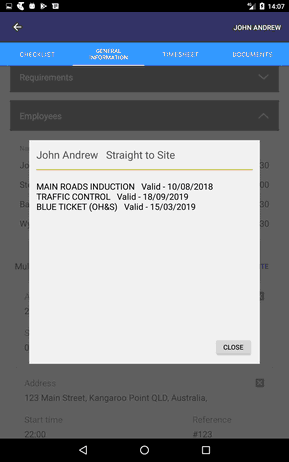
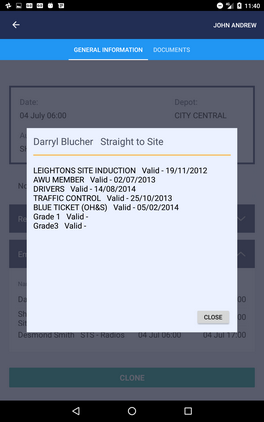
"Employees" drop down list (tap the arrow to expand/collapse the list), displays each employee's name, role, start and end date and time. Tapping on each employee will open a popup which provides information about his/her qualification(s) and expiry date(s).
At the bottom of the General Information page there is a Save / Accept button. If the job is not confirmed you can see the job details and accept it from this page. If it is already confirmed, you can enter the timesheet(s) presented on the "TIMESHEET" tab, complete the checklist at the "CHECKLIST" tab, and then save them, along with multiple locations (if any added) by tapping the "SAVE" button.
Keep in mind that after completing the timesheet(s) and checklist you need to come back to the "GENERAL INFORMATION" tab and tap the "SAVE" button to finish and send your collected data.
A successful submission of data will take you back to the Job list page and will mark the job as "Completed".
In the case of any error/s, a message will pop up at the bottom of the page to indicate the unsuccessful save attempt as shown in the following image.
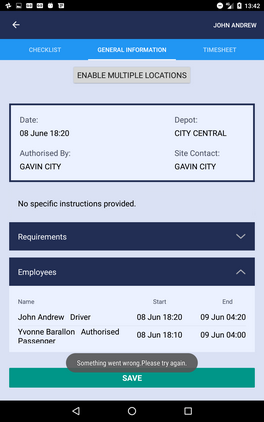
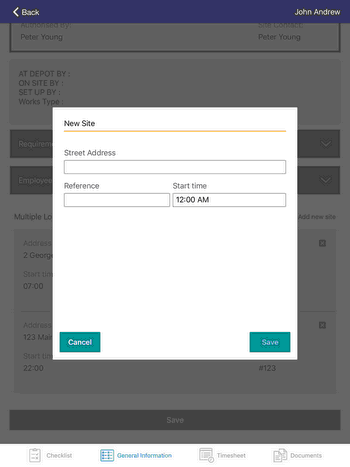
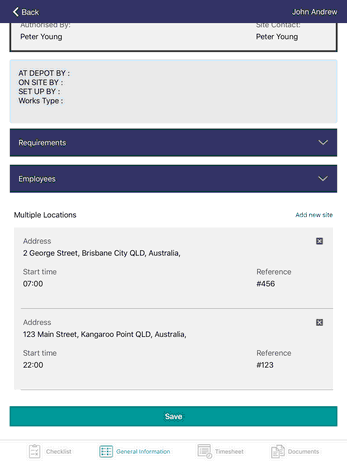
6.2.1.1 Adding Multiple Locations
If you have permission to add multiple locations, the "Enable Multiple Locations" button will be available under the job header section at the top of the page. Tapping it will add the Multiple Locations section to the bottom of the page where you can find the "Add New Site" button. Tapping on this button will open a pop up form to allow you to add in a new job location, reference number, and start time. In order to enable the save button, there must be a reference and a start time, or an address and a start time. Clicking save will add this new location to the Multiple Locations section list where the locations will be ordered by start time. You can remove any of the locations by tapping on the red x button.
6.2.2 Timesheet
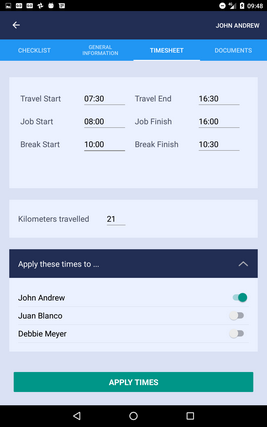
Tapping the "TIMESHEET" tab opens the timesheet page where you can fill in the times for yourself and other employees on the shift, if you have the permission to do so. The first image below shows the "Timesheet" page without permission to complete other employees timesheets, while the second image has the "Apply these times to" drop down list in the lower section of the page.
If the user has the permission to enter times for other employees, the "Apply these times to" drop down list will be available and will display the logged-in employee (i.e.:John Andrew at below image) along with other employees.
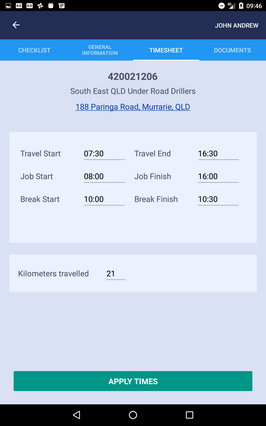
On the first image above, complete the times and Kilometers travelled and tap the "APPLY TIMES" button and hit the "SAVE" button on the "GENERAL INFORMATION" page.
On the second image, complete the times and Kilometers travelled, toggle on the switch(s) for those employees you want to apply the times to and then tap the "APPLY TIMES" button.
If you want to enter different times for each employee, simply tap the employee name, enter times and then tap the "APPLY TIMES" button.
If you want to review the times entered, or see existing times, tapping each employee name will update the page to display that employee's times, if any exist, or default values.
Just keep in mind that tapping the "APPLY TIMES" button does NOT submit your entered values to the server. In order to finish and send your values you will need to tap the "SAVE" button at the bottom of the "GENERAL INFORMATION" tab.
6.2.3 Checklist
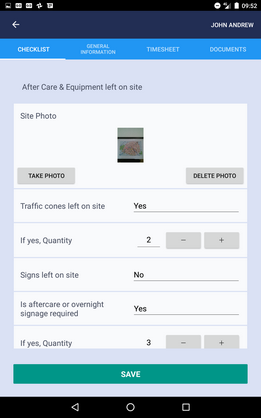
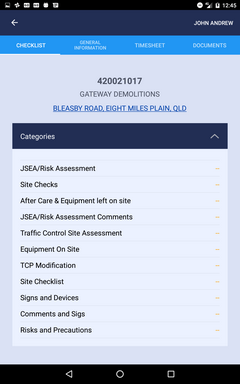
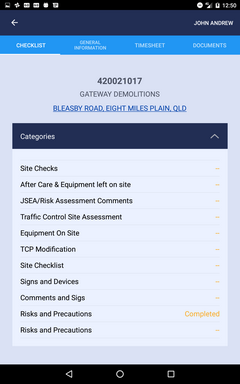
As it is illustrated in the following image, the "Checklist" page consists of a number of predefined "Categories" (first image). Tapping each category will open a set of questions for that category (second image). At the very top of the page the selected category's name is displayed ie:Comments and Signs.
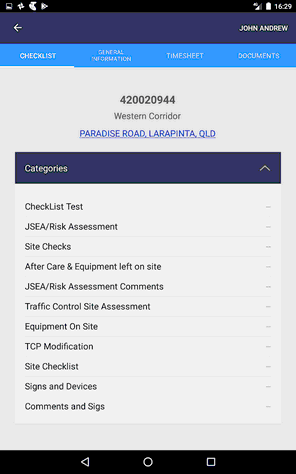
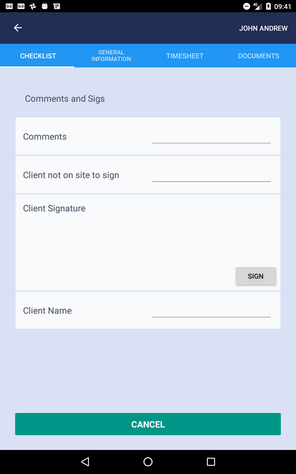
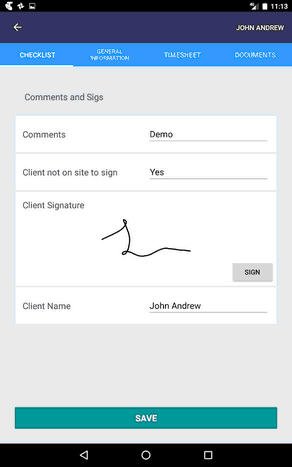
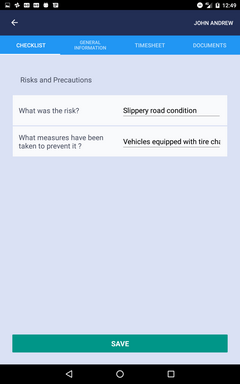
In the first image, the last category called "Comments and Signs" is tapped. The second image displays the question set for that category and the third image shows the completed one. As seen in the image, filling in the form replaces the "Cancel" button with the "Save" button. You can come back to the list of categories either by tapping the "Cancel" or "Save" buttons.
Saving the completed form will mark its category as "Completed", the orange completed text at the end of the row. However, like the "Timesheet" page, in order to finish and submit data tapping the "SAVE" button on the "GENERAL INFORMATION" page is necessary.
There are different question formats including but not limited to the following types:-
| • | Text and numeric entries |
| • | Time which opens up a time picker to select a time. |
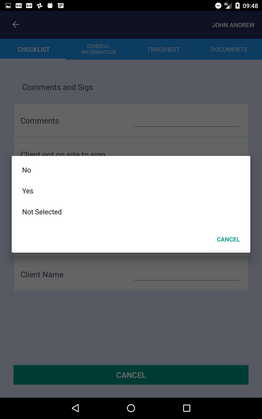
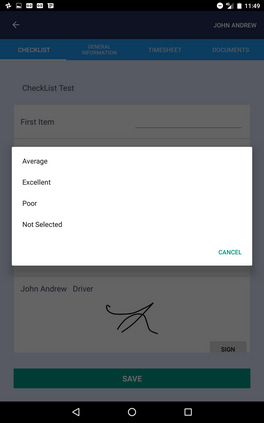
| • | Single choice and Multiple choice . Tapping the entry area will open a pop-up displaying a list of options/choices including "Not Selected" which can be used to change the value to its default. |
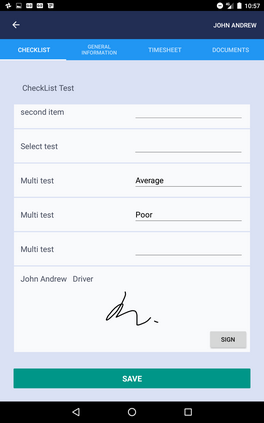
If the type of question is multiple choice, completing the question will create an empty duplicate of the question, giving you the opportunity to select another option as well, as you can see in the image below. The example values of "Average" and "Poor" are two options selected for the same question called "Multi test".
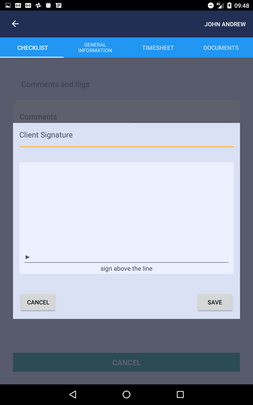
| • | Signature types: To enter your signature tap the "Sign" button which will open a signature pad where you can sign and hit the "Save" button to save your signature and come back to the form. Tapping the "Cancel" button navigates you back to the form without saving your signature. |
| • | Photo or image type: To take a photo simply tap the "Take Photo" button. It will launch your device's camera. However, you may be asked to grant permission to the MyManstat application, to access your camera. |
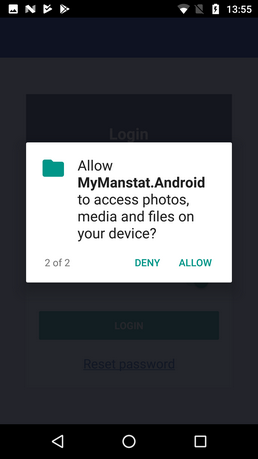
If the access is denied, you will not be able to take a photo.
Note: If you tap on "deny", you will no longer be presented with the dialog to allow or deny the permission. See "App Permission" section above for more information.
Once a photo is taken, it will be displayed in the form along with the "Delete Photo" button. As its name implies, tapping the "Delete Photo" button will remove the photo.
6.2.3.1 Self cloning Category:
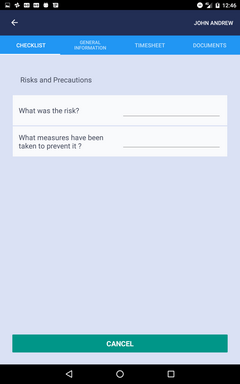
There are some scenarios where a category may consist of an unknown number of grouped questions and answers. These groups of questions and answers are not predefined like the other categories shown in the above images and can be any number. As an example,a category called "Risk Assessment" can be intended to collect a number of possible risks and measures that have been taken to tackle each risk.
Another example can be a "Requirements" category to collect a list of required vehicles,equipment or signs and and their quantity.
Completing a "Self Cloning Category" and saving it will duplicate the category at the "Categories" list on the "Checklist" page.
The following images show the entire process and outcome. As you can see in the last image, another "Risks and Precautions" category is added to the list, the first one marked as "Completed" and the next one (which is new) a duplicate "Risks and Precautions" category.
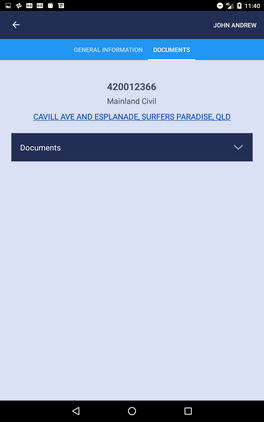
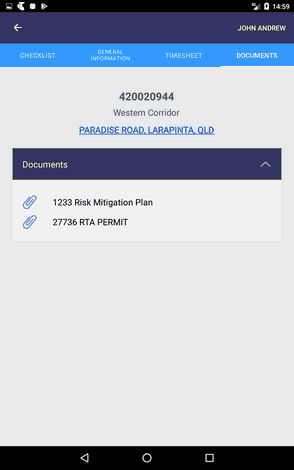
6.2.4 Documents
Tapping the "DOCUMENTS" tab will open a page where you will see a list of documents. Tapping each document will open the document.
Note: The "Documents" tab will only be available if any document(s) have been assigned/attached to the job and the user has the permission to see the document(s).
7. ASSESSMENTS
Similar to "ASSIGNMENTS", if you have permission to see and manipulate the assessment jobs assigned to you, you will either be navigated directly to the Assessments List page or you will be presented with the "ASSESSMENT"
option at the "Welcome" page ( last option in the image below).
7.1 Job List PAGE
Tapping the "ASSESSMENT" option will take you to the Job List Page with two tabs namely "List" and "Map View". You can toggle between each view by either swiping left or right or tapping the "List" or the "Map View".
At the top of the page you can click on the refresh button to update your Assessment jobs. You can tap the back button to navigate to the previous page or you can also log out.
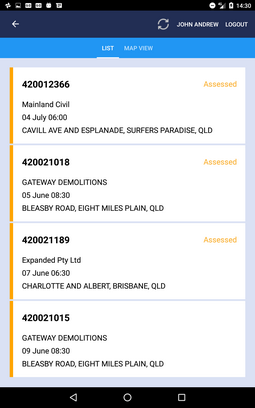
The "List" tab's content is a linear list of assessment job(s) assigned to you and each item on the list displays a summary of the job, including the job number, company name, start date and time and job address.
Whereas the "Map View" displays a map and presents each job as a location pin. Tapping on each pin will display a detail label showing the Job Summary similar to the "List" one. On Android devices tapping the detail label will take you to the "Job Details" page.
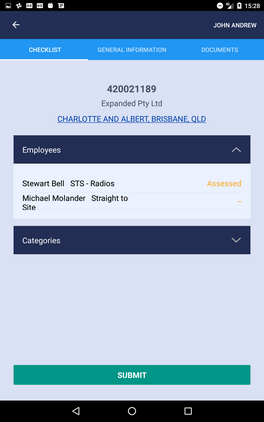
At List page job(s) with submitted checklist is/are marked as "Assessed".
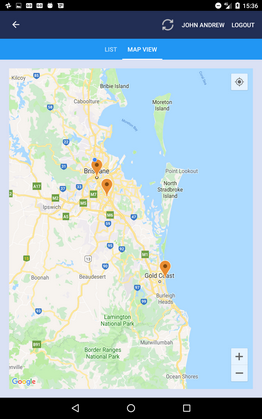
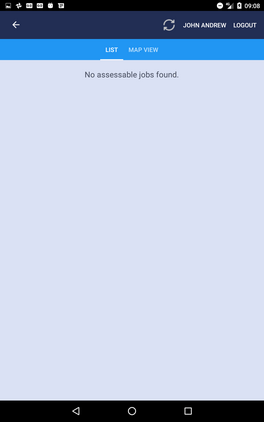
If there is no assessment, the assessment list page's "List" view will look like following image and therefore there will be no location pin on the "Map view".
7.2 Job Details page
Tapping each job will take you to the Job Details page with three tabs namely "General Information", "Checklist" and "Documents". You need to have specific user permissions to be able to see the "Checklist" and "Documents" tabs (described in the user permissions section of the manual).
In addition to the required permission , the "Documents" tab will only be available if the job has any related document(s).
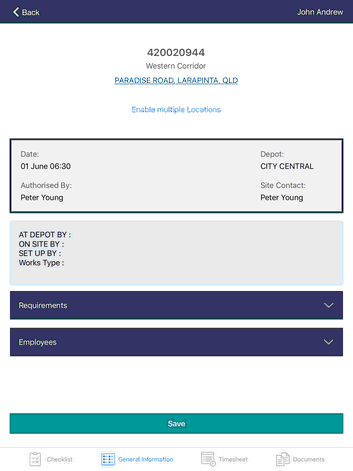
7.2.1 General Information

At the top of each page you will find the job header displaying the job number, company name and its address.
Tapping the underlined address line at the job header will launch your device navigation application if available i.e.:"Google Maps".
To return to your MyManstat app, on apple devices, tap the "MyManStat" arrow at the top of the map view, and on android devices tap on your device's back button to bring you back to the app.
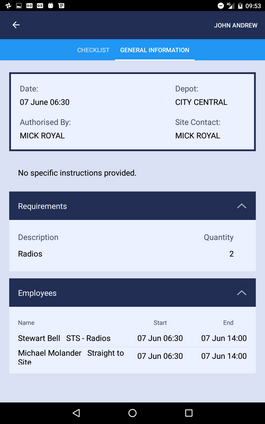
In addition to some information including the job's start date and time, authorizer, depot and its site contact (foreman), there are three sections including "Note and Specific Instructions" (if there are any), "Requirements" and "Employees".
The "Requirements" drop down list (tap the arrow to expand/collapse the list), displays the job's requirements and quantity for each requirement.
The "Employees" drop down list (tap the arrow to expand/collapse the list), displays each employee's name, role, start and end date and time. Tapping on each employee will open a popup which provides information about his/her qualification(s) and expiry date(s).

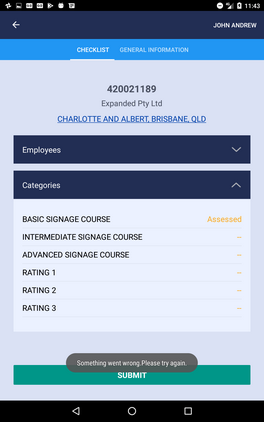
7.2.2 Checklist page
In addition to the job header at the top of the page, there are two sections called "Employees" and "Categories".
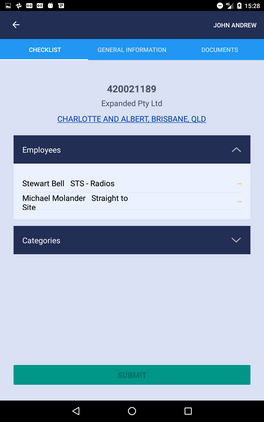
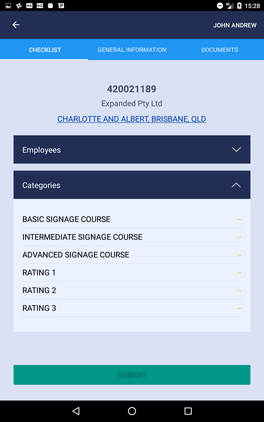
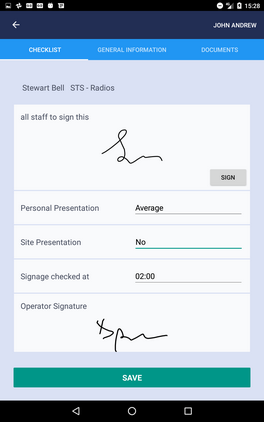
"Employees" displays all employees to be assessed. Tapping each employee's name (row) will open a set of predefined questions. Unlike "Categories", all of the employees have the same set of questions.
At the top of the form the selected employee's name and role is presented. Completing/editing the form and saving it will take you back to the list of employees and will mark the employee as "Assessed".
The next drop down list is "Categories" where you can find a list of categories to be assessed. Each category on the list has a different set of questions which are accessed by tapping that category.
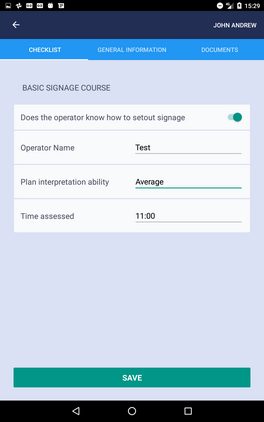
At the very top of the page the selected category's name is displayed i.e.:Basic Signage Course.
Similar to "Employees" ,saving the completed form will mark the category as "Assessed".
At the bottom of the "Checklist" page you will find the "Submit" button which is disabled by default. Completing each employee/category's assessment will enable the button.
You don't have to tap the "Submit" button after completing each employee or category's assessment. Once you complete the relevant employee/category's assessments, tapping the "Submit" button will finish the assessment and send your completed forms to the server.
In the case of any errors, a message will pop up at the bottom of the page to indicate the unsuccessful submit attempt.
Successful submission of the assessment will take you back to the assessment list page with the assessed job marked as "Assessed".
The following section describes the question types on the Checklist page.
There are different question formats including but not limited to the following types:
| • | Text and numeric entries |
| • | Time, which opens a time picker to select a time. |
| • | Single choice and Multiple choice . Tapping the entry area will open a pop-up displaying a list of options/choices to select from, including "Not Selected" which can be used to change the value to its default. |
If the question type is multiple choice, completing the question will create an empty duplicate of the question, giving you the opportunity to select another option as well, as you can see in image blew. The example values of "Average" and "Poor" are two options selected for the same question called "Multi test".
| • | Signature types: To enter your signature tap the "Sign" button which will open a signature pad where you can sign and hit "Save" to save your signature and come back to the form. Tapping the "Cancel" button navigates you back to the form without saving your signature. |
| • | Photo or image type: To take a photo simply tap the "Take Photo" button. It will launch your device's camera. However, you may be asked to grant permission to the MyManstat application to access your device's camera. |
If the access is denied, you will not be able to take a photo.
Note: If you tap deny, you will no longer be presented with the dialog to allow or deny it. See "App Permission" section above for more information.
Once a photo is taken, it will be displayed in the form along with the "Delete Photo" button. As its name implies, tapping the "Delete Photo" button will remove the photo.
7.2.2.1 Self cloning Category:
There are some scenarios where a category may consist of an unknown number of grouped questions and answers. These groups of questions and answers are not predefined like the other categories shown in the above images and can be any number. As an example,a category called "Risk Assessment" can be intended to collect a number of possible risks and measures that have been taken to tackle each risk.
Another example can be a "Requirements" category to collect a list of required vehicles, equipment or signs and their quantity.
Completing a "Self cloning Category" and saving it will duplicate the category at the "Categories" list of "Checklist" page.
The following images show the entire process and outcome. As you can see in the last image, another "Risks and Precautions" category is added to the list, the first one marked as "Completed" and the next one (which is new) a duplicate "Risks and Precautions" category.
7.2.3 Documents
Tapping the "DOCUMENTS" tab will open a page where you will be presented with a list of documents. Tapping each document will open the document.
Note: The "Documents" tab will only be available if any document(s) have been assigned/attached to the job and the logged-in user has the permission to see the document(s).
8. Bookings
If you have "Booking" permission, you will either be navigated directly to the Bookings List page or you will be presented with the "Bookings" option at the "Welcome" page i.e.: first option showing in the image below.
8.1 Booking List page
Tapping the "Bookings" option will take you to the Booking List Page with two tabs namely "List" and "Map View". You can toggle between each view by either swiping left or right or tapping the "List" or the "Map View".
At the top of the page you can click on the refresh button to update the booking list, you can tap on the back button to navigate to the previous page or you can also log out.
The "List" tab's content is a linear list of bookings and each item on the list displays a summary of the booking, including the booked job number, company name, start date and time and the booked job's address. The "Map View" displays a map and presents each booking as a location pin. Tapping on each pin will display a detail label showing the Booking Summary similar to the "List" one.
On Android devices tapping the detail label will take you to the "Booking Details" page. If no booking has been added, the bookings list page's "List" view will look like the second image and therefore there will be no location pin on the "Map view".
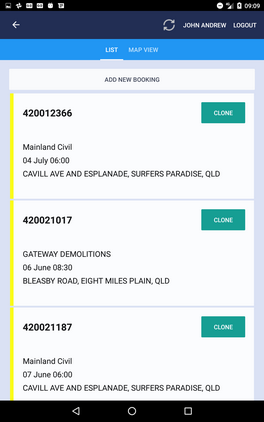

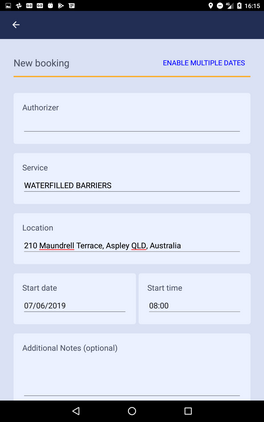
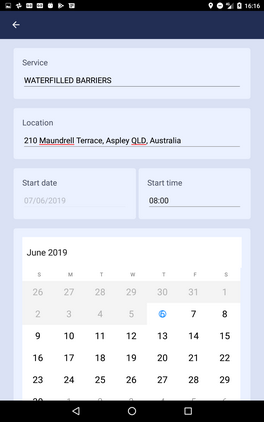
8.1.1 Add or Clone Booking
Pressing the "ADD NEW BOOKING" button opens a New booking form. It is possible to make a booking for a single date as well as multiple dates with the same time by tapping "ENABLE MULTIPLE DATES" button at the top of the page. As you can see in the second image, enabling multiple dates displays a calendar, and disables the "Start Date" field. You can select multiple dates by selecting them on the calendar.Tapping a selected day will unselect it. To select a single date, remove the calendar and enable the Start date field, tap the "DISABLE MULTIPLE DATES" button at the top of the page.
Once the form is completed, tapping the "Save" button will take you back to the Bookings List page displaying your new booking, along with other existing bookings.
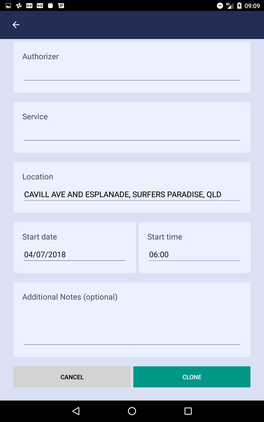
In addition to add a new booking, you can clone an existing booking by tapping the "Clone" button on each booking in the list or from the Booking Details page.
You can modify the booking's details and tap the "CLONE" button at the bottom of the page to save the changes and clone it.
Like saving a new booking, cloning it will take you back to the updated Bookings List page.
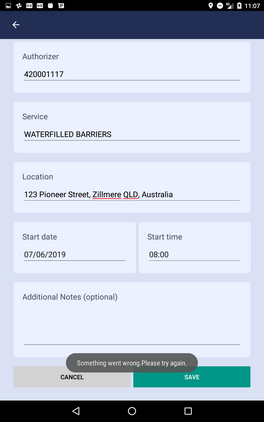
If saving or cloning a booking fails for any reason, a small pop up will notify the unsuccessful attempt.
8.2 Booking Details
Tapping each booking opens the Booking Details page with two tabs namely "General Information" and "Documents". The "Documents" tab will only be available if the job has any related document and the user has the permission to see them.
8.2.1 General Information
At the top of each page you will find the job header displaying the job number,company name and its address.
Tapping the underlined address line at the job header will launch your device navigation application if available i.e.:"Google Maps".
To return to the MyManstat app, on apple devices tap the "MyManastat" arrow at the top of the map view, and on android devices tapping on your device's back button will bring you back to the app.
In addition to the job's information including the job's start date and time, authorizer, depot and job's site contact (foreman), there are three sections including note and specific instructions (if there are any), "Requirements" and "Employees".
The "Requirements" drop down list (tap the arrow to expand/collapse the list), displays the booked job's requirements and quantity for each.
The "Employees" drop down list (tap the arrow to expand/collapse the list), displays each employee's name, role, start and end date and time.Tapping on each employee will open a popup which provides information about his/her qualification(s) and expiry date(s).
8.2.2 Documents
Tapping the "DOCUMENTS" tab will open a page where you will be presented with a list of documents. Tapping each document will open the document.
Note: The "Documents" tab will only be available if any document(s) have been assigned/attached to the job and the logged-in user has the permission to see the document(s).