|
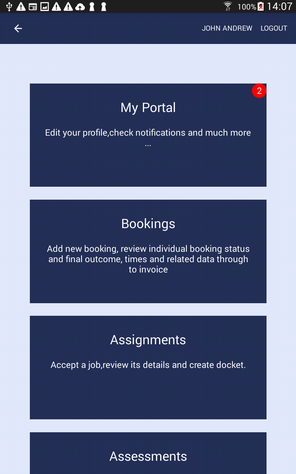
User Portal |
  
|
|
User Portal |
|
(By adding the User Portal, now the welcome page is not permission based and will contain the User portal and based on the logged-in user the other tabs, so we need to change the user manual)
9. User Portal
User Portal is consist of four tabs, namely “Profile”,” Calendar”, “Messages” and “Licences”.
You can toggle between each view by either swiping left or right or tapping each tab.
9.1 Profile tab
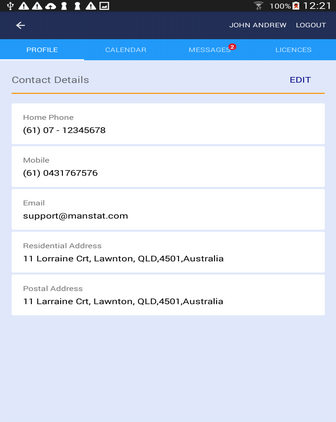
Profile view displays user’s contact details. As shown in the above picture, user is able to review and edit his/her contact details by tapping the EDIT button.
Once in “Edit mode” user have two options:
1. Updating the content by tapping on each entry to open the keypad to enter the new values
2. Deleting the record entirely by tapping the red delete button on the top left corner of each tile.
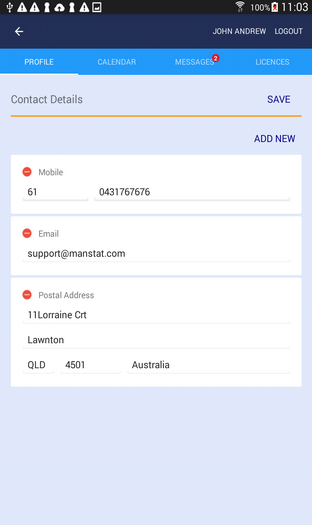
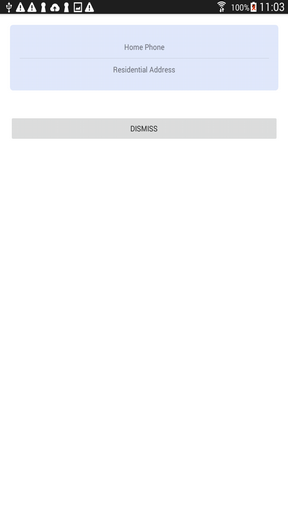
Adding a new item or a deleted item is also possible by tapping on the “ADD NEW” button and selecting (by tapping) an item from the list as shown in the image above.
The “ADD NEW” button is only available if there is a missing item from the list of predefined items to be added to the list. In this example, the list is consist of “Home Phone”, ”Mobile”, ”E-mail”, “Residential Address” and “Postal address” and only one record can be added for each item.
As you can see in the images above only “Home Phone” and “Residential Address” are missing in the left image, so tapping the “ADD NEW” button will open a list with only two missing options, shown in the right hand side image.
After editing/adding/deleting the records, tap the “SAVE” button to save the changes.
9.2 Calendar:
Calendar view displays the days of the current month, and user can swipe to the right or left to view the previous or the next month. Tapping each day will list its events/entries under the calendar view as illustrated in the image below.
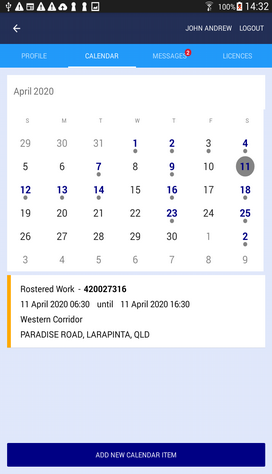
By default, calendar only shows entries from 30 days ago to the next 30 days. Days with event(s) are displayed with a grey dot under them.
Blocking and read-only entries are displayed orange in color in the list below the calendar and their dates are displayed in Blue.
The following table shows the different types of calendar entries.
Calendar Entry types |
Is Blocking |
Is Read-only |
Rostered Work |
P |
P |
Unavailable |
P |
P |
Unavailable to work at employee request |
P |
|
Applied Leave |
|
|
Approved Leave |
P |
P |
Requested Sick Leave |
|
|
Work Cover |
P |
P |
Approved Sick Leave |
P |
P |
9.2.1 Adding Calendar Entry:
User can apply for leave by adding a calendar entry of the following types:
| • | Unavailable to work at employee request |
| • | Applied Leave |
| • | Requested Sick Leave |
As it can be seen in the “Calendar Entry Types” table, these entries are NOT Read-only.
It means user is able to add or delete them. These entries can be added in the past or future, however only entries can be deleted that their end date are in the future.
Selecting the date with these types will display the event details under the calendar view with grey indicator (unlike the read-only types which are displayed in orange) with the “Discard” button (if the end date is in the future).

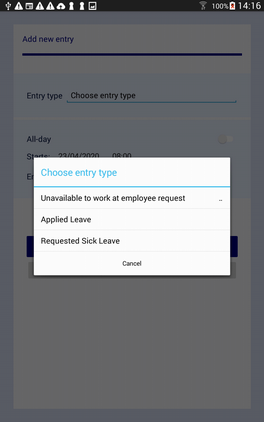
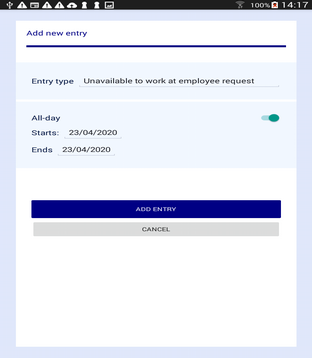
Tapping the “ADD NEW CALENDAR ITEM” opens an entry form where you can select an entry type from the list (shown in the second photo), enter the start and end dates and times.
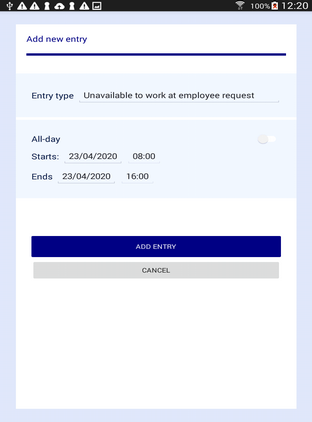
User can also enable the “All-day” switch instead of entering times for the record.
9.3 Messages
When the user has unread message(s) the “User Portal” tile in the “Welcome Page” and “Messages” tab in the “User Portal” page will display a number badge indicating the number of user’s unread messages.
The “Messages” view itself lists user’s unread messages along with the issue and expiry dates.
Tapping each message tile will toggle the status of the message from “Unread” to “Read” and vice versa.
The messages with the status of “Unread” are indicated with the orange bar in their tile while the messages with the “Read” status have the grey bar in their tile.
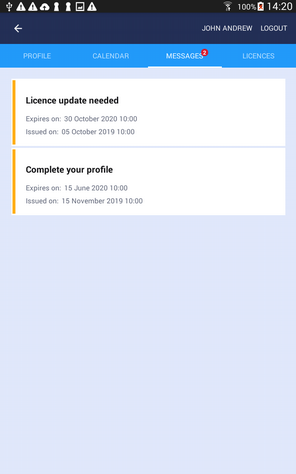
The image below displays the list with one “Read” and one “Unread” messages.
Please note that “Messages” Tab’s number badge is one indicating that the user has only one unread message in the list.

9.4 Licences
Licence view is consist of a list, displaying user’s current licences. By tapping on each licence user can view or edit the licence details including the licence image, number, expiry and so on.
To take a photo of your licence simply tap the "Take Photo" button. It will launch your device's camera. However, you may be asked to grant permission to the MyManstat application, to access your camera.
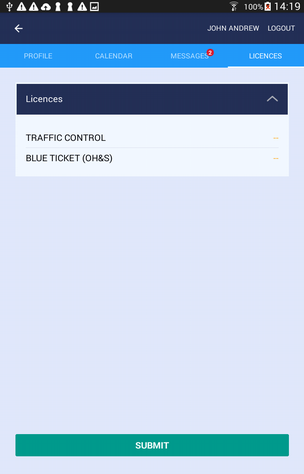
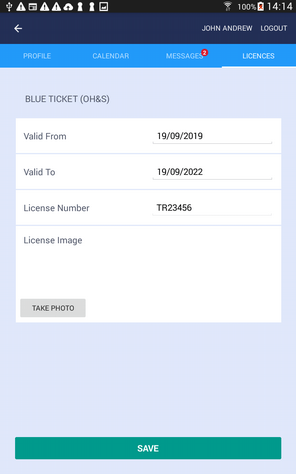
After making the changes to each licence, the “SAVE” button will save them and return the user to the Licence list page where user should tap the “SUBMIT” button to commit the changes.