|
Creating a new contact |
  
|
|
Creating a new contact |
|
The Add Contact screen allows you to record the personal details of a new contact including mailing and contact information, as well as more detailed reference information such as transaction history, previous contact history and relationships with other contacts. Part of building a personal relationship with a contact is to treat them as individuals, understanding and reacting to their particular needs and circumstances. The key to doing this successfully is to gain as much information about your contacts as possible. The more information the better.
ManStat attends to this aspect of direct marketing by allowing you to enter a wide variety of information about any contact. This information can then be quickly and easily accessed for a wide variety of marketing exercises. The more information you have means the more targeted your marketing exercises can be. You will be able to identify more specific target groups for particular marketing exercises, allowing you to obtain a higher return for your investment. This will save you money and time.
New contacts can be added by selecting New contact from the File menu at the top of the ManStat screen. This will reveal the Add Contact screen. Alternatively, simply click on the Add button located at the bottom of the Contact Maintenance screen. (For information on the Contact Maintenance screen, please refer to the Help chapter entitled "Contact Maintenance".)

At the top left of the Add Contact screen a Contact code is displayed for this new entry.
ManStat automatically creates a unique code for each individual contact. Below this contact code, there is a field entitled Record Type. Select the appropriate category for the contact you are entering from the drop down list associated with this field (for example an individual, a company or a joint contact).
Once you have selected the record type, the appropriate fields will appear at the top right of the Add Contact screen. Enter the contact's name, position details, and company name in these fields. (Or, if the new contact is a company, enter the company name and then the name of the contact person and their position.)
When entering an individual the person's title, first name, middle initial and last name should be entered in the contact fields in the following format:
![]()
Depending upon the type of record being entered, a … button may appear next to the Company field. Clicking on this button reveals the
Contact Find screen. This shortcut allows you to quickly reference a company that this Contact is associated with, if the company already exists within ManStat as a Contact.. For more information on this screen, please refer to the Help chapter entitled "Contact Find".
Below the contact name, the position details and the company name, ManStat will display an Access By field and a Modify By field. These fields can be used to limit who can access this contact's information, and who can modify or change this contact's information. To determine who has the ability to access or modify this new contact's details, simply elect the appropriate security function from these drop down lists. For more information on security functions, please refer to the Help chapter entitled "Security Functions Maintenance".
To enter electronic address details (such as the phone number or email address) simply right click on the relevant field or entry, and select Add Phone Number from the menu displayed. This will reveal the Add Phone Number screen. Changing or deleting existing electronic address details can be done by selecting the relevant choices from the menu displayed.
If your system is supported by the technology, it is possible to direct dial a telephone number listed here by simply right clicking on the relevant entry and then selecting Execute from the menu displayed. If the contact details listed are email or internet addresses, ManStat will also allow you to connect to the addresses by right clicking on the relevant listing and selecting Execute from the menu displayed.
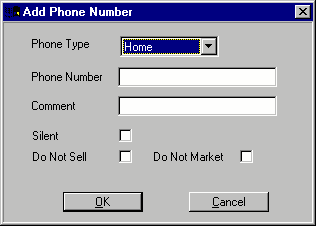
At the top of this screen is the Phone Type field. This field is used to detail the type of electronic address that this entry represents. Choose the relevant phone type from the drop down list associated with this field.
Enter the new details in the Phone Number field, and a short description in the Comment field. Three check boxes are displayed in this screen. By selecting or de-selecting these you can record information specific to these contact numbers, such as whether to market or sell to the contact using these numbers, or whether the number is listed or is silent. Once you have entered or updated these contact details, simply click on the OK button to return to the Add Contact screen.
At the bottom of the Add Contact screen various tabs are displayed. These tabs allow various types of information to be viewed and updated for each contact, including the types of transactions made, the types of mailings sent, and the relationships that exist with other contacts. For a detailed description of each of these tabs, please refer to the Help chapter entitled "Contact Tabs".
Please note that many of the fields contained in these tabs will display information that is automatically updated by ManStat, and will therefore be read only fields. Because this is a new contact, many of these read only fields will be empty.
Once you have entered the required information for this contact, simply click on the OK button located at the bottom of the Add Contact screen. If you do not wish to continue with the creation of this new contact, simply click on the Cancel button located at the bottom of the screen.