|
Adding an Employee |
  
|
|
Adding an Employee |
|
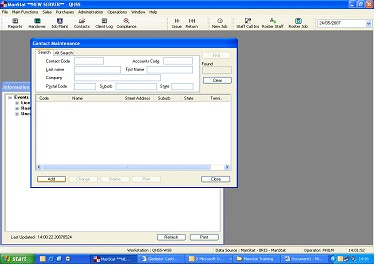
1.Click "Contacts" on top Menu bar, "Contact Maintenance" Window should appear
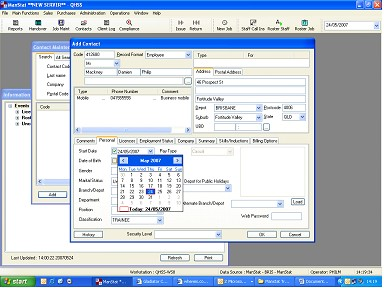
2.Select "Add" button at the bottom of the "Contact Maintenance" window, the "Add Contact" window should appear as below
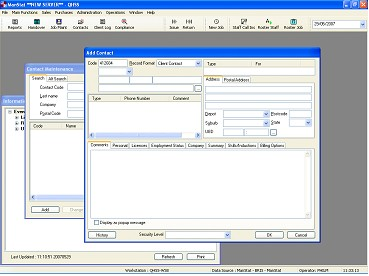
3.Select "Record Format" a drop down box will appear, select "Employee"
4.Select title from the drop down box
5.Input Name, last name first, middle name then first name
6.Input Address in the "Address" tab located to the left section of the window
7.Select Depot i.e. Brisbane, North Coast, or South Coast from the drop down box located just below the address section
8.Input Suburb, State and postcode located in the same area
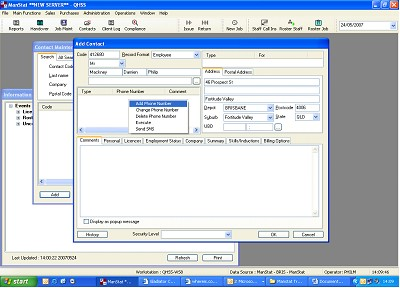
9.Right click over phone number blank area as above there will be a selection of 5 options
10.Select "Add Phone Number", the "Add Phone Number" Window should then appear as below
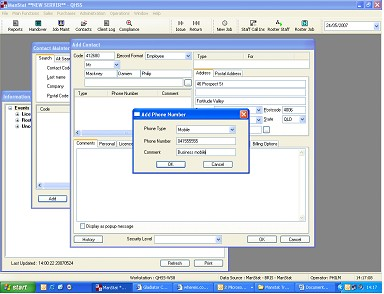
11.Input "phone type" from drop down box
12.Input "phone number" ensuring that the area code is also input with no spaces or brackets
13.Input Comment (example shown), when inputting the next of kin phone number ensure that the name of the next of kin is placed in this section
14.Click "OK"
15.Repeat until all contact numbers and emails are input
16.Select "Personal" Tab from the tab menu in the middle of the window
1.Click "Start Date" select the date from the calendar as shown
2.Click "Date of Birth" and select or input date of birth
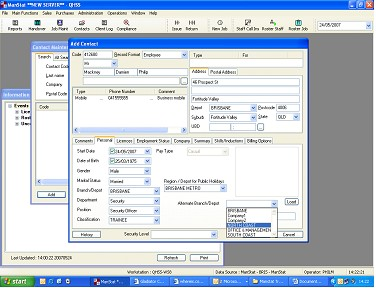
19.Select "Gender" from drop down menu
20.Select "Branch" i.e. Brisbane, North Coast or South Coast from drop down menu
21.Select "Department" from drop down
22.Select "Position" from drop down menu
23.Select "Region/Depot for public holidays" from drop down menu
24.Select "Alternate Branch/Depot", (this is another area the employee may work regularly) from drop down menu as shown above

25.Select "Licenses" on tab menu bar
26.Right click in "Type" blank space a selection of 3 should appear
27.Select "Add License" as above
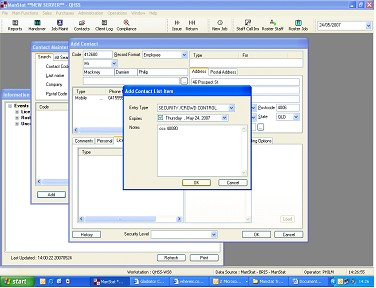
28.Select "Type" of license to be added from drop down menu
29.Input Expiry date from calendar
30.Input notes (This should include license number and any conditions on number, for renewals this must include the receipt number and who or if a member of OFT has been spoken to.)
31.Click "OK" in the window
32.Repeat until all licenses and certificates are input
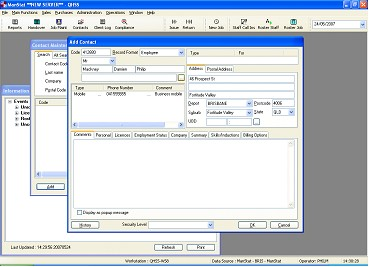
33.Click the small square below the first name, this signifies which parent company the employee will be allocated
34."Contact Find" window should appear as shown below

35.Input the internal company code e.g. "Comp1" into "Contact Code" located at the top left section of the window. The company is allocated by Administration, you are to contact admin prior to allocating a company
36.Click "Find" in the window
37.Double click the line that appears
38.Click "OK" at the bottom of the "Add Contact" Window
39.You should now see the beginning screen again showing the information Centre