|
Adding a Job |
  
|
|
Adding a Job |
|
Adding a Job
FIRSTLY ASK YOURSELF or the CLIENT: "Is this a continuation or a new job?"
Continuation Job (see How to book a Continuation Job)
| 1. | Select "New Job" from the left hand side of the Manstat screen |
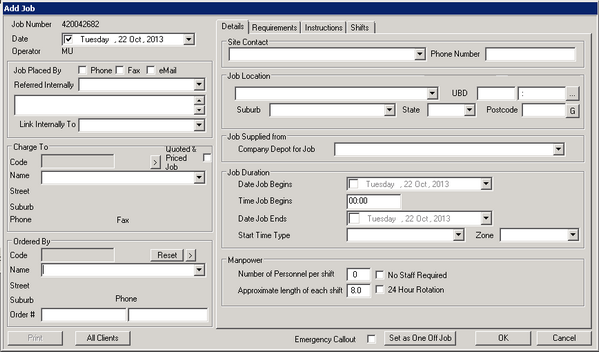
| 2. | Entering a job follows a simple path starting top left and moving down before starting top right and moving down and finally clicking on each of the tabs at the top and moving down through the fields. Ignore the Charge To box as this will be auto filled once the Ordered By box is filled |
| 3. | Select "Job Placed By" and tick located in the upper left section of the "Add Job" window |
| 4. | Use the drop down arrow located next to the “Link Internally To” field to pick the internal company used to bill from for this job. |
| 5. | Use the drop down box located in the bottom left "Ordered By" section to select which Client the job is for. Note that typing the client into this field will not link it to the job and the job will need to be reset. Check that the Charge to information box above correctly populates once a client is selected. |
| 6. | Enter order number some clients may be locked to require an order number before the job can be booked. **Note If an order number is received after the job completed, see Entering a Purchase Order Number Once a Job is Completed by using job costing** |
| 7. | Repeat this in the top right section of the window, in "Site Contact" middle top |
| 8. | Input Job Location |
| 9. | Select "Job Supplied from", this is again a drop down box which has selection allocating the job to a particular depot or region. This is important for companies with multiple depots or in some cases this may be used to distinguish away jobs. |
| 10. | Input information into "Job Duration", each selection in this area is drop down boxes |
| 11. | Input number of personnel and length of longest shift duration into "Manpower" |
| 12. | If this is an Aftercare Only job, click on the No Staff Required check box and leave the Number of Personnel Per Shift at 0 |
Click "Requirements" tab located at the top right of the "Add Job" window
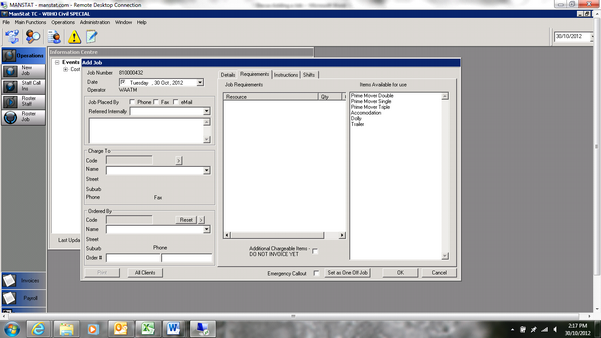
13. Select items required for the job from the "Items Available for use" list, multiple items can be selected; once they have been selected they will appear in the list in the middle of the screen. To remove a resource simply click on it and it will be removed. Selecting Vehicle Basic from the list will automatically create a “Driver” shift
Click “Instructions” tab located at the top right of the "Add Job" window
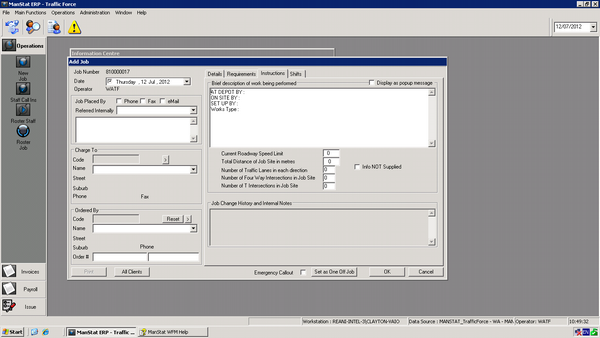
14. Add times according to the specifications of the particular job, including the type of works being conducted and what is required on site i.e. Arrow boards, Pick up ute 427 from depot etc. and fill in the Current Roadway Speed Limit boxes if known, if not, just leave blank
Click "Shifts" Tab at the top of the window, the designated shifts will appear as below
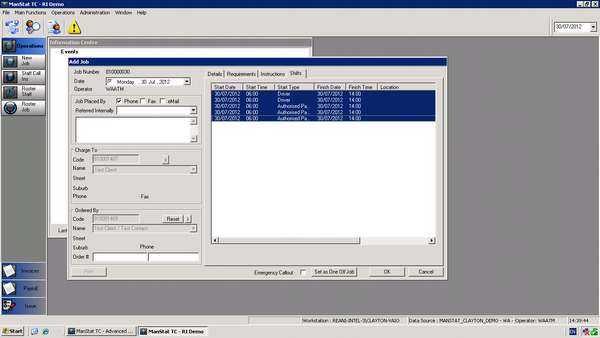
15. Check the Shift information is correct paying particular attention to shift type as this may affect payroll.
16. Add, Change or Delete any shifts by right clicking the space or over the selected shift (this will be needed for RAIL or PORT shifts)
17. Make a selection and make changes as required
18. Once shifts are correct click ok and the job is booked. The job can be now viewed in job maintenance as a cross check.