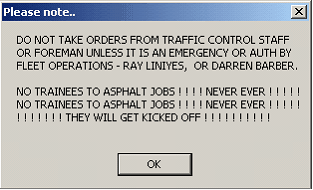
|
Traffic control specific |
  
|
|
Traffic control specific |
|
Job Details Screen

To make certain all information is entered into the job booking, follow the layout with the red directional arrows as below. Then proceed to the next tab "Away Job" (see Booking An Away Job), then the "Job Information" tab (see Job Information", then finally the "Shift Creation" tab (see Shift Creation).
NB: Try to become familiar with the process of booking jobs before you try to take bookings over the phone, clients often have little time to book jobs.
31. Directional Flow Diagram
As soon as you click the "New Job" button, a generated "Job Number" appears on the booking screen. The date and Operator's name also appears automatically, see below.
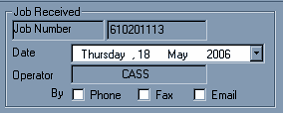
Job Received By….
Left-hand click, in the appropriate square to tick/check the means in which the job was booked, eg. If a client calls in, tick 'phone', if we receive a fax, tick 'fax'. Rarely do we get orders via email.
Authorising Client Name
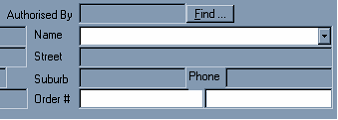
Type the first name and the first letter of the second name of the Foreman or the Authorising person in the "Name" box. Use the scroll button on the mouse to search through the different names quickly, or alternatively use the small down arrow on the right-hand side of the box. Eg. Craig L and scroll down to reveal Craig Lawrence Brisbane City Works. If you cannot find the clients name go to "Adding New Contact to Client List".
NB: If the booking is being done by phone always double check with the client what company they are with, because sometimes different people can work for different companies or have changed companies since they last booked.
NB: Some names can be spelt differently or a nick name may be used, eg. Steven, Stephen or Steve, Michael or Mick or Mike etc. Keep this in mind when you are searching for a client's name.

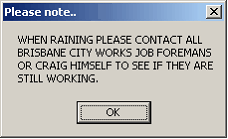
After finding the correct client's name, press either the "Enter" key or the "Tab" key to confirm your choice. Important information boxes pop up, read each message carefully, this information helps you book the job correctly and reminds you about some client specific details. These pop ups will help you familiarise yourself to clients a little better.
NB: To add pop up information see "Adding Pop Up Information"
Order Numbers
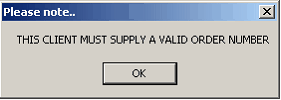
NB: Always ask for an "Order number". Some clients refuse to pay for their work in no "Order Number" is provided with the invoice.
NB: Gold Coast City Council are NOT to have traffic control booked without an order number ever!!!! Ask them politely to generate an order number and get them to call back. Depending on different clients, order numbers can vary.
"Order Numbers" may look similar to: 50213-103, VPS55534, 502, Bill etc.
Job Location
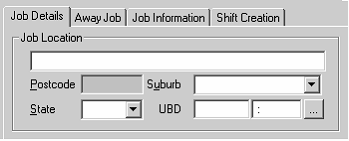
The "Job Location" must be as precise as possible, ie a street number, a street name or the corner of two (2) streets, eg. 36 Trinity Lane or Traffic St corner Roadworks Rd.
-Always add a suburb
Do not start the "Job Location" with: "corner of" or "Main Roads Depot" or "Pink Building", this only cause confusion and makes it difficult to find the job when searching with "Job Maintenance".
Instead put: Blue St corner Green St, Banyula Drive @ Main Roads Depot (gangers last name), Billabong Rd @ Pink Building.
Always add a state.
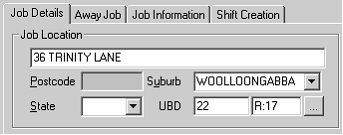
UBD Reference
After typing the address and suburb, left-hand click once on the small square with three (3) dots on it in the right-hand bottom corner. The screen below will appear. This will only work in Brisbane, Gold Coast, Sunshine Coast and some Ipswich areas, for all other states and regions just manually type UBD reference in.
Click "Find" and the high-lighted information will come up. Click on the high-lighted information and click "Select", this will enter the UBD reference into the job booking.
NB: Always use the UBD aid to give the UBD reference.
NB: If no UBD reference is appearing, there may be a few reasons:
*check the spelling and try a few alternative ways to spell the street and suburb name
*the location may not have UBD coverage in that area
*the location may not have been put into the UBD yet, eg. New estates and developing areas
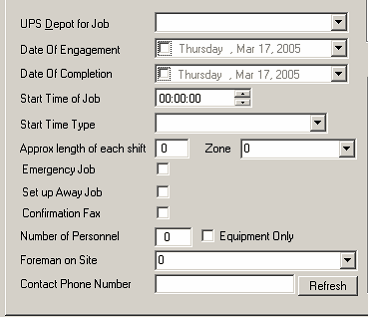
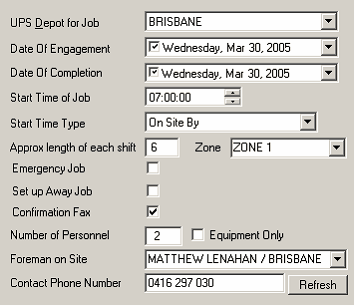
35b.Depot for Job
The depot you choose depends on the location of the job. If you are uncertain of the depot, look it up in the UBD and find the closest depot.
*To choose the depot, left-hand click on the small down arrow next to the "UPS Depot for Job" Box. Scroll down or up using either your mouse scroll wheel or the scroll bar that pops up at the side of the box. Simply click on the desired depot.
35c. Date Of Job
![]()
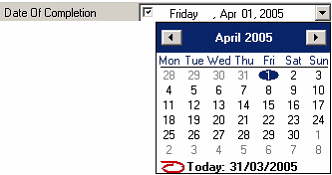
For a job for one (1) day both the "Date of Engagement" and "Date of Completion" will be the same.
![]()
For a job going more than 1 day "Date of Engagement" and "Date of Completion" vary.
Once you click on the small down arrow to enter the start and finish date, little calendars appear, then click on the desired date manually.
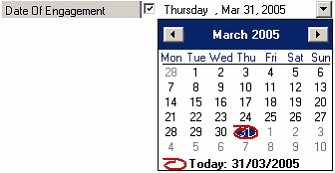
NB: You can book jobs weeks at a time, just be careful about the weekends. If the job is definitely on for the weekends, there is nothing to worry about. However, if Saturday, Sunday or both days are not required, you will need to manually delete those days in the "Shift Creation" tab. (see Shift Creation" tab)Be mindful of the dates of the weekend shifts as the day's name will not appear in "Shift Creation", just the date. There is a small calendar on the top right hand side of the Rosters program you can use to help you with this.
35d. Start Time Of Job
![]()
To enter the "Start Time of Job" point the cursor at the first set of 00(double zeros) and type in 0 before the time if it is an AM time, eg. For eight-thirty, type 08 press the  or
or  button, then 30. This will display as the time above.
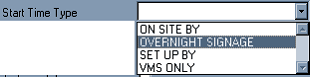
35e. Start Time Type
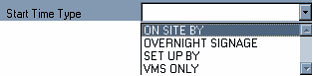
Mostly "Start Time Type" is just On Site By. This refers to the start time. This is chosen by left-hand clicking on the small down arrow on the right-hand side of the "Start Time Type" box.
36. Overnight Signage
When Employees have to leave signage at a job site over night or the job requires signs for 24 hours, the Employees get the foreman to ring in or the clients books the job like normal. If no Employees are required to stay with the signage a separate job is booked in, see below.
In the "Start Shift Type" select Overnight Signage. You also need to tick the "Equipment Only" shown below.
The job is booked like a normal is the Employees just leave the signs out following on from their job. The only difference is that no amount of employees are entered, or a how many hours required, this should be reflected in the "Job Related Instructions" (see Job Related Instructions).
If the signage is put out without Employees being required firstly, one 1) driver must be booked at a "Four Hour Minimum"(covered in the Rostering Manual" to put out the signs. Subsequently, when the client no longer requires the signs, an additional "Four Hour Minimum" must be booked to pick up the signs; this should be reflected in the "Job Related Instructions" (see Job Related Instructions)
Emergency Job
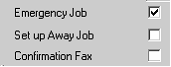
The box marked "Emergency Job" is ticked when the job is being booked in less than 2 hours before the proposed start time of the job. The job then appears on the "Information Screen" and becomes a high priority.
39. Set Up Away Job
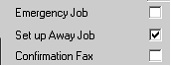
The box marked "Set Up Away Job" is ticked when the job is situated too far away from the nearest Depot. (see Booking An Away Job) Also, click the "Away Allowance Per Man/Night" into the job booking, 1 for each employee per night.
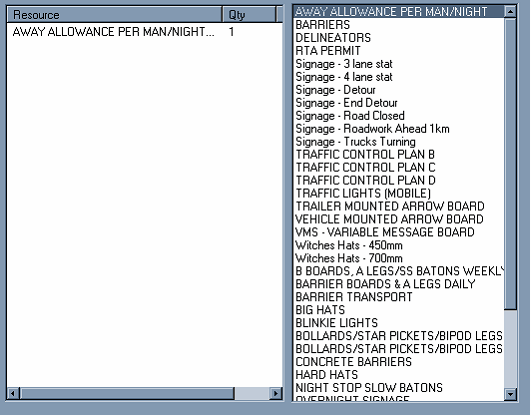
This screen is found in the "Job Information/Requirements" tab. This will charge out automatically as $100 per Employee per night.
Permits/ TCP/Police Services
If permits are required choose the council by the location of the job and which council the job site falls in. Use the small down arrow and scroll bar to do this. If a Police permit, Main Roads Permit, Traffic Control Plan, Police Services, is required tick the box next to each.
For every "Council Permit" a "Police Permit" is automatically required. This makes both the Council and the Police aware of any medium to large works happening in their zones. Permits are required whenever more than a Partial Lane closure is happening. A Partial Lane Closure still allows for traffic to flow.
When the site in at a set of traffic lights (when the lights have not been turned off) or is complicated, Police are sometimes hired to keep order and help control traffic – that is "Police Services".
A "Traffic Control Plan" is a sophisticated and precise mud-map, drawn within guidelines and Australia Standard Accredited. Traffic Control Plans are required to be attached with the application for "Permits" for in the city and jobs on main roads and busy roads. When Booking job that required TCP (Traffic Control Plans) you must get all the particulars of the job and type them in the "Job Related Instructions" (see Job Related Instructions).
Things to note when getting information for a TCP:
| - | what machinery is on site |
| - | are they digging trenches? re-sealing road? cutting concrete? pouring cement? |
| - | What street the job site is on, and what streets it is running from |
Eg. Tree St (Btw Flowerpot Lane and Garden Rd)
- is it a lane closure or road closure?
After this job is booked see "Booking an External Resource"
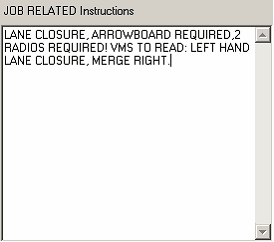
JOB RELATED Instructions
Simply type extra and important information in the empty box shown below.
The more details the better; try to give the Employees as much information as possible. The more precise the information the easier it is to find the job location.
NB: Rosters staff need to be able to understand the instructions so they may pass it on correctly to the Employees.
What information could go in the "JOB RELATED Instructions" box?
*UBD references eg.UBD ref 99 M:14
*Request for specific Employees eg. Requests Tom Cruise & Drew Barrymore
*Number of radios required eg. 2 radios required!
*VMS details eg. VMS to read: Left lane closure, merge right!
*Short jobs eg. Job to go 3 hours maximum (this helps roster when very busy)
*Advise if heavy machinery will be on site, eg. Cherry picker on site
NB: Always use upper-case for entering job details
Equipment
Tick the boxes for the required equipment and add how many of each is necessary in the other box.
NB: Always ask the client if they required a vehicle and radios, and how many
| Radios- | two-way radios allow the Employees to communicate with each other when they are not in the direct line of sight with one another. |
| Vehicles- | the vehicles are fully equipped with signs to sign up jobs on the road |
The default amount for radios is 2, and vehicles is 1, any other needs to be changed manually.
| V.M.S- | Variable Message Sign is a big flashing message board, this is good for bigger jobs and highway jobs. The VMS gives traffic information about which lane/road is closed and which way to merge or to detour, or different traffic announcements. |
| Trailer Mounted Arrow- | this is an arrow that directs traffic which way to merge, or just alerts traffic to the fact that there is works ahead |
| Barriers- | can be water filled or concrete; they are used to block of streets and protect workers on high volume or fast speed jobs |
Job Information Screen Tab
If a vehicle has been booked we need to enter some site details so the right signs go out to the specific job. This is important to do correctly. Some jobs require "Highway signs" to cope with 110kmph zones and if this information is not passed along the Employee may turn up on with "Insufficient Equipment", this is both time costly and the Client often get annoyed, it is also very dangerous.
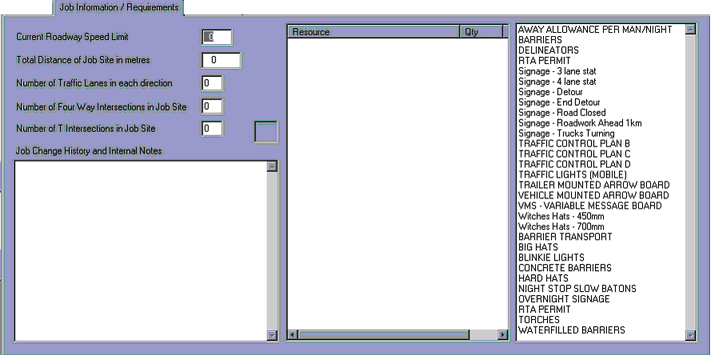
Current Roadway Speed Limit -Enter the speed limit of the job.
If the speed limit exceeds 80kmph, 2+ Employees must go to that job.
Total Distance of Job Site in metres - Enter the length of the job site. Number of Traffic Lanes in either direction - Enter the number of traffic lanes in either direction.
Number of Four Way intersections in Job site - How many 4-way intersections are on the job site?
Number of T Intersections in Job Site - How many T intersections are on the job site?
If the foreman cannot give you any of these details and you do not know them yourself, ask your supervisor.
Shift Creation Screen Tab
In this tab, you basically just check the "shift" is correct.
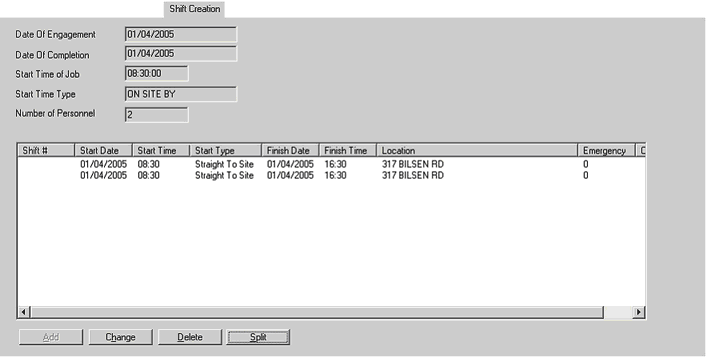
If they are press the "OK" button.
When booking jobs phoned in:-
-always make certain the person you are talking to is the person you are booking the job for.
-always try to guide the caller (Client) into answering your question in the sequence you fill out the job booking
-always ask for an order number, this is necessary for proper invoicing
-always repeat the details to the client at the end of the booking
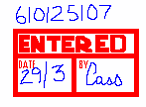
When booking jobs off faxes:-
-always write down the ManStat Job Number next to the job, so that when the faxes are checked nightly the jobs are easily found, the number will look something a little like this – 610152432, a nine (9) digit number.
-always look for an order number, this make look different depending on which fax you are entering.
-always stamp "Entered" on the fax after you have put it into the system and initial and date it. If the fax only has one job to enter on it, put the job number above the entered mark.

![]()
-different companies have different set-outs for their orders, all orders require to give certain details to make the booking correct. If all the information necessary is not given, call the contact or foreman on the order to obtain the rest of the information. This is not common but can happen.